 For this week's Spotlight on Success we travel to Middletown High School to shine the light on second year teacher, Taylor Garboski. Taylor was recommended to spotlight by both administrators and teachers for her success and positively contagious attitude.
We contacted the Algebra teacher and asked that she answer the following question: Do you have any words of wisdom or tips for your colleagues on how to be successful in this hybrid environment and/or integrating technology with your students? Taylor's response: My best words of wisdom would be: I know technology can be frustrating at times, but keep pushing yourself to learn new things! I have been taking risks in the ways I use technology in class, sometime it is great...other times it flops! But I always have a good time with my students! Rich Cordaway, the Secondary Math Curriculum Supervisor had this to say about Taylor: Ms. Garboski's enthusiasm and ability to connect with her student helps make Math an interesting experience. She helps them understand and believes that all of them can learn Math at a high level. Thank you Taylor for your words of wisdom, and dedication to your students!
0 Comments
 This week's Spotlight on Success highlights Bielefield Elementary School's own dynamic duo Marty Skelly and April Baehr. Last week, we asked for members of Middletown Public Schools to tell us about stand out teachers who demonstrate successful practices in their hybrid learning environment and how they creatively integrate technology into their classrooms. It took less than 30 minutes to get a glowing recommendation about this pair of fourth grade teachers.
We contacted Marty and April and asked them to reflect on the question below. After being humbly surprised by this much deserved recognition, this is how they responded (and demonstrated why the spotlight should shine brightly upon them!): Do you have any words of wisdom or tips for your colleagues on how to be successful in this hybrid environment and/or integrating technology with your students? Marty & April's Response: We would start by saying one word: KISS, (Keep It Simple Silly) followed by the statement; “Don’t be afraid to take risks!” My partner (April) and I had been using a variety of technology for years. We had been using Google Classroom for many assignments and our students were somewhat comfortable with it. All that changed on March 13th and every day since has been a learning experience. Our successes have come through many mistakes, reflections, and adjustments. We came up with a system that has worked well for the students as well as for us.This includes a Padlet we created with our Weekly schedule and linked it into Google Classroom as material. This is the only link students have to go to because we have linked all assignments, classrooms, and resources through the Padlet. Basically, we are using Google Classroom as a clearinghouse for assignments and keeping it simple for the students to find assignments with ease by not having to navigate around the Google Classroom unnecessarily. We have set controls to eliminate excessive alerts, notifications, and emails, etc that overload our inboxes and platforms that significantly reduce the amount of time spent going through the digital clutter. We have also eliminated the student chat and post features to prevent possible time consuming negative cyber situations while promoting digital citizenship through other more controlled means of student digital interactions on platforms like Zoom and Jamboard. We have been using live Zoom meetings while keeping the meeting open and available for students to be in constant communication with us throughout the school day. To expand upon the theme of we are all one class no matter where we are sitting, and to promote educational equality, the daily Zoom meeting affords all students access to the classroom teacher and peers for synchronous and asynchronous learning every day. The access to breakrooms has been tremendously successful in increasing student engagement and accountability and providing frequent opportunities for discourse, student-led learning opportunities, small groups, conferencing, and socially and emotionally development. In addition, we use ClassDojo as a means of regular communication with families. This is especially helpful when students are having technical difficulties with accessing Zoom, providing parents with a direct line of communication to us to help troubleshoot issues so that valuable instruction time is not lost over simple fixes. Although every day we face new challenges while embracing the dynamic change in our role as educators, we have found these strategies in this hybrid environment that enable us to successfully integrate technology with our students. Do you have a colleague that should be recognized for their success integrating technology into instruction or implementing successful hybrid learning practices? Please let us know by emailing Michelle Gohagon.  It is difficult to stay on top of everyone new technology trend in education. Luckily, there are two reasons why this is ok:
Michelle As we adapt to Hybrid Learning the need for technology support is critical. Therefore, we want to be sure that you know how to receive the tech support that is needed. Where do you go for specific tech support? Please see below:
Create a website using Google SitesYou can create a completely functional teacher website using Google Sites, which is a part of your Google account!
Goto www.sites.google.com. Select New Google Sites. Select the plus sign in the red circle in the bottom right corner to create your new site. Click on Untitled Site in the upper left corner to name your website project. Click on Your page title to title your website. This is what visitors to your site will see. When you click on the text, a basic editor window will appear. Click where it says Title to change the size and type of heading. Next is your justification setting, the hyperlink icon, and finally the trashcan to delete the text. To change the color and style of your text and upper banner, click Themes in the upper right corner. You will have several options to choose from. Note that you do not have infinite customizable options. Below your header is now a white, empty space waiting for content. To start adding content, be sure you select Insert from the menu in the upper right. The above picture contains a few of the main editing options - a text box to insert text onto the page, images to insert a photo, ember URL to include a link to an external webpage, and upload to include a file located on your computer. Other possible additions to your site can be found in the menu on the right side of your screen.
Once you add any of the above to your site, then can then left-click and drag your new addition to another part of the page. You can also grab the blue “handles” that appear then your file is selected to make it appear larger or smaller on the page. To add more pages to your site, select Pages from the upper right, then click on the icon indicated in this photo. Be sure to give your page a relevant name, as that is the name that will appear in the page’s navigation menu. Note that you will not see this navigation menu until you create at least a second page. Just right of center near the top of your screen, you will see the above menu. The left-arrow is to undo your last edit, the right-arrow to redo. The eyeball will allow you to preview your site as visitors would see it on the web. Use this frequently while editing your site to ensure that your edits are yielding the desired results. The plus sign next to a person’s head is the familiar Google share icon. You can share your site with your colleagues so that they can collaborate with you on it. Finally, when you are finished editing, click Publish. Under Site Location, enter a short variation on the name of your site. This will complete your website’s URL, for example, https://sites.google.com/mpsct.org/yoursitename. Under Who can visit my site, select Anyone on the web if your site is intended for parental viewing. If your site is only for MPS staff or students, you can select Anyone at mpsct.org. If you would like assistance creating your site, please contact Instructional Technology Coach Steve Matthews at [email protected] to set up an appointment. Created by Steve Matthews, MPS iTech, 8.23.17 You can create a completely functional teacher website using Google Sites, which is a part of your Google account!
Goto www.sites.google.com. Select New Google Sites. Select the plus sign in the red circle in the bottom right corner to create your new site. Click on Untitled Site in the upper left corner to name your website project. Click on Your page title to title your website. This is what visitors to your site will see. When you click on the text, a basic editor window will appear. Click where it says Title to change the size and type of heading. Next is your justification setting, the hyperlink icon, and finally the trashcan to delete the text. To change the color and style of your text and upper banner, click Themes in the upper right corner. You will have several options to choose from. Note that you do not have infinite customizable options. Below your header is now a white, empty space waiting for content. To start adding content, be sure you select Insert from the menu in the upper right. The above picture contains a few of the main editing options - a text box to insert text onto the page, images to insert a photo, ember URL to include a link to an external webpage, and upload to include a file located on your computer. Other possible additions to your site can be found in the menu on the right side of your screen.
Once you add any of the above to your site, then can then left-click and drag your new addition to another part of the page. You can also grab the blue “handles” that appear then your file is selected to make it appear larger or smaller on the page. To add more pages to your site, select Pages from the upper right, then click on the icon indicated in this photo. Be sure to give your page a relevant name, as that is the name that will appear in the page’s navigation menu. Note that you will not see this navigation menu until you create at least a second page. Just right of center near the top of your screen, you will see the above menu. The left-arrow is to undo your last edit, the right-arrow to redo. The eyeball will allow you to preview your site as visitors would see it on the web. Use this frequently while editing your site to ensure that your edits are yielding the desired results. The plus sign next to a person’s head is the familiar Google share icon. You can share your site with your colleagues so that they can collaborate with you on it. Finally, when you are finished editing, click Publish. Under Site Location, enter a short variation on the name of your site. This will complete your website’s URL, for example, https://sites.google.com/mpsct.org/yoursitename. Under Who can visit my site, select Anyone on the web if your site is intended for parental viewing. If your site is only for MPS staff or students, you can select Anyone at mpsct.org. If you would like assistance creating your site, please contact Instructional Technology Coach Steve Matthews at [email protected] to set up an appointment. Created by Steve Matthews, MPS iTech, 8.23.17
A new feature of Google Drive is that of the Team Drive. Now you can create shared Drives within your Google Drive and give access to any of your colleagues!
This may seem redundant if you are already sharing documents, but chances are some people are missing what you have shared with them. Check out the presentation for a quick starter! Google recently rolled out an update to Google Classroom allowing teachers to distribute assignments to certain students within a class, allowing for greater ease (and confidentiality) in differentiating assignments. After initially creating the assignment, click on "All Students" as indicated below. You can select specific students from the resulting drop-down list. Only the selected students will see the assignment in their class stream. 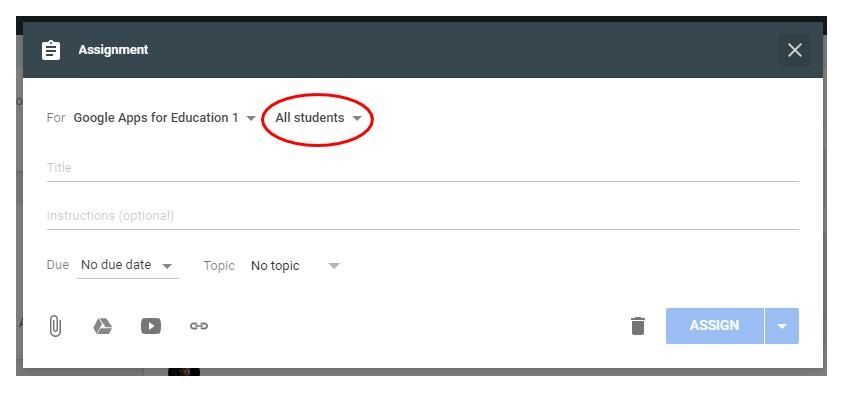 See also this video: The uploading of artifacts to a form in My Learning Plan can be potentially confusing. You can upload files from your computer, and you can share files from your Google Drive. This video outlines how to do both. If you would rather a printed set of directions complete with diagrams, check this out. Note that the link is only available to Middletown Public Schools users. As teachers are increasing their usage of Google Classroom, the need for students to log in from home is also increasing. Parents may occasionally run into trouble helping their children access this, so here are directions and a video to help! Steve Matthews Instructional Technology Coach Middletown Public Schools |
MPSiTechWelcome to the Middletown Public Schools Instructional Technology Site MPS iTech Newsletter
Newsletter Vol 1, no 8
Newsletter Vol 1, no 7 Newsletter Vol 1, no 6 Newsletter Vol 1, no 5 Newsletter Vol 1, no 4 Newsletter Vol 1, no 3 Newsletter Vol. 1, no 2 Newsletter Vol 1, no 1 Archives
May 2021
Categories
All
Who we follow: |
 RSS Feed
